
- Overview▼
- Features
- Installation
- Getting Started▼
- Import Video Files
- Video Editor
- Set output settings
- Option
- Convert Video
- Technical Support▼
- FAQ
- Register


Overview
Pavtube Video to iPod Converter is an easy-to-use tool to convert different video files into Apple’s iPod (iPod classic, iPod nano, and iPod touch) supported *.mp4, *.mov, *.m4v formats. More than outputting optimized H.264 and MPEG-4 encoded files and various audio files (.mp3, .m4a, .aiff, aac) for iPod, Pavtube Video to iPod Converter also comes with format presets for other Apple devices, including iPad, Apple TV, and iPhone. So you can also use it as a Video to iPad Converter, a Video to Apple TV Converter, as well as a Video to iPhone Converter.
Why choose Pavtube Video to iPod Converter?
- Pavtube Video to iPod Converter is able to make almost all videos playable with your iPod classic, iPod nano, and iPod touch.
- Intuitive and easy-to-use interface can make you use it masterly for the first time.
- Perfect video and audio synchronization with excellent image and sound quality.
- The conversion speed is much faster than other software when enabling CUDA acceleration.
- Its editing functions allow you to crop, trim, do advanced settings as you like for better effects.
- We provide users with lifetime free technical support service. If you have any questions, problems, and suggestions about our software, please email us to support@pavtube.com
The Next

Features
Pretty easy to use
With its simple and intuitive interface, you can easily finish conversion without any troubles.
Support input various file types
The input files are covering MOD, TOD, MTS/M2TS, MXF (some MXF files only) footages captured by JVC, Panasonic, Cannon, Sony, DVs/cameras/camcorders, TiVo recordings from TiVo DVRs, M2TS and VOB files from copy protection removed Blu-ray discs and standard DVDs, FLV/F4V files downloaded from video sharing websites like YouTube, Metacafe, Hulu…, the popular MKV files, Xvid/Divx encoded AVI files, WMV/MOV/TS/TP/H.264/MPEG-4 files and more.
Well support for TiVo recordings to iPod conversion
TiVo (.*tivo) files recorded by a TiVo DVR can be converted to specialized H.264/MPEG-4/MP4 files for playback on iPod and other mobile devices, like iPhone 4, iPad 2, etc.
Perfect audio and video synchronization
The video to iPod converter software adopts optimized audio and video in sync technology, which will never let you encounter any troubles caused by audio and video out of sync issues.
Support CUDA speedup
This video to iPod converter software takes full advantage of the latest NVIDIA CUDA technology to largely accelerate decoding/encoding speed. The GPU acceleration saves users time when converting videos to another format by using H.264 codec.
Deinterlacing
The deinterlacing option allows you to convert interlaced video into a non-interlaced form, so that you can enjoy a better and clearer video effect. Apart from that, the program also provides various other special effects, like simple laplacian sharpen, gray, flip color, invert, aged film, etc.
Trim and crop video
The trim function allows you to get a specific length of video accurately, since its inner seek function can capture any key frame of the video, while with crop function, you can cut off the black edges and unwanted video areas easily.
Merge multiple videos and replace original audio track
You are allowed to join multiple videos into a single file for conversion, as well as replace the original audio track with other music or sound track.
Add text, image, and video watermark
The Video to iPod Converter enables you to add different watermarks to your video file, including text, image (including GIF), and video watermark, so you are ready to get a picture-in-picture effect on your video.
Capture the snapshot images
You can capture and save your beloved video scenes as snapshots images at will.
Customize format menu
The program allows you to arrange the format profile list as you like. Hide the unwanted formats profile list and save customized format to Custom group for ease of use.
Shut down computer after conversion
Pavtube video to iPod converter keeps you free from waiting around by ticking off the checkbox “Shut down computer after conversion” when processing video conversion.
The Next
Installation
System Requirements
- Operating System: Windows 2000/XP/2003/Vista/Windows 7
- DirectX Version: 9.0 or above
- Memory: 64MB at least
- Processor: 500MHz Intel or 500MHz AMD CPU
- Hard Disc Space: 512MB or above
Install & Uninstall
To install Pavtube Video to iPod Converter, please
- Download Pavtube Video to iPod Converter setup file.
- Double click on the setup file to begin installation.
- Follow the instructions to install Pavtube Video to iPod Converter on your PC.
To remove Pavtube Video to iPod Converter from your computer, please
- Hit Windows Start and go through the following options: All Programs -> Pavtube -> Video to iPod Converter -> uninstall Pavtube Video to iPod Converter.
- From Windows Start menu, select to open “Windows Control Panel”. Double click “Add or Remove Program”, scroll to “Pavtube Video to iPod Converter”, and click Remove.
More details are provided at How to install and register Pavtube software.
The Next
Getting Started
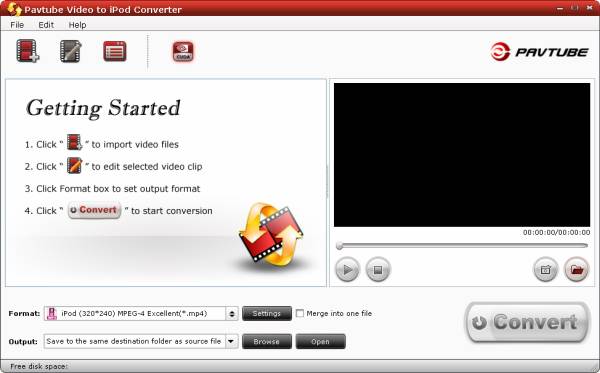
Buttons Overview

![]() - Add video files into this program
- Add video files into this program
![]() - Edit video contents to meet your special needs.
- Edit video contents to meet your special needs.
![]() - Set update settings; Specify storage place and file format for snapshot images; Load Media Access Key to import TiVo recordings.
- Set update settings; Specify storage place and file format for snapshot images; Load Media Access Key to import TiVo recordings.
![]() - CUDA on. (On a CUDA enabled PC, the conversion speed will be greatly accelerated when converting videos to another format by using H.264 codec.)
- CUDA on. (On a CUDA enabled PC, the conversion speed will be greatly accelerated when converting videos to another format by using H.264 codec.)
More about the CUDA icon:
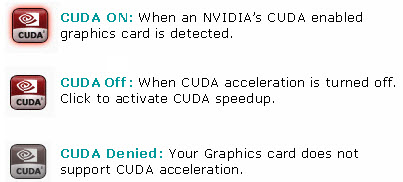
Note that CUDA is accessible only when there is an NVIDIA graphics card that supports GPU en-decoding acceleration. The CUDA button will be grayed out/ denied when the software fails to detect a satisfactory NVIDIA graphics card. And The CUDA works only when creating H.264 encoded video files. Learn more about Pavtube software supported graphics cards.)
The Next
Import Video Files
Click ![]() button to import your source videos into this program.
button to import your source videos into this program.
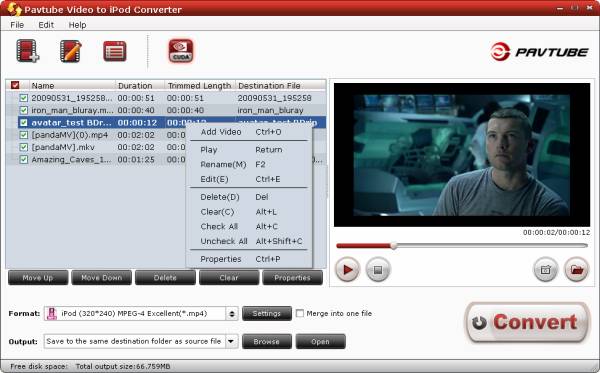
You are allowed to add multiple videos into the program at a time, and all files are checked by default once loaded. You can right-click on a file to “Uncheck All” or “Check All” to make your selection easier.
a. File list labels
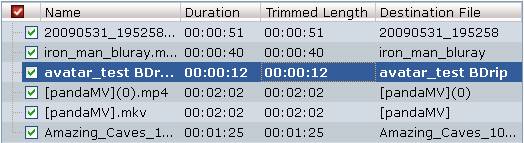
Name: the name for each file
Duration: the original length of each file before conversion
Trimmed Length: the length of each file after trimming
Destination File: the name of the converted file
b. The Preview Window
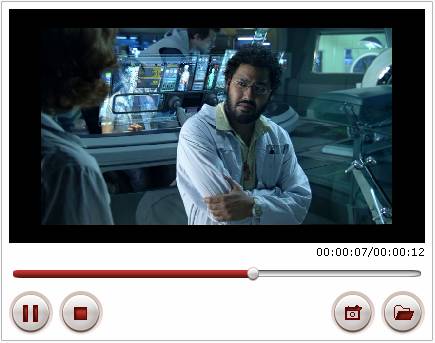
Play button ![]() - Pause or play the video.
- Pause or play the video.
Snapshot button![]() - Snapshot the pictures and save them on your computer.
- Snapshot the pictures and save them on your computer.
Stop button![]() - Stop playing.
- Stop playing.
Open button ![]() - Open the snapshots folder.
- Open the snapshots folder.
c. Make quick control of imported video files
![]()
Move Up: Move the selected file up one line
Move Down: Move the selected file down one line
Delete: Click to remove the loaded file.
Clear: Click to remove all the imported files.
Properties: Click to see the properties of the imported video.
The Next
Video Editor
You can click ![]() to edit the video contents before processing format conversion. There are six functions available: Trim, Crop, Text Watermark, Image/Video Watermark, Effect, and Audio Replace.
to edit the video contents before processing format conversion. There are six functions available: Trim, Crop, Text Watermark, Image/Video Watermark, Effect, and Audio Replace.
![]()
Trim: Select video durations by setting the start time and the end time.
Crop: Cut off black edges and unwanted areas.
Text Watermarking: Add text to the video as watermarks.
Image/Video Watermarking: Add image or video to the source video as a watermark.
Effect: Adjust brightness, contrast, saturation of the video, and add special effects to the video.
Replace audio track: Take place of the original audio track with your specified sound track.
In addition, there are some user-friendly control buttons for you to preview and edit selected video file conveniently. Please refer to the tool bar below.

Play/Pause: Click to start playing the current video or pause the playing.
Stop: Click to quit playing video.
Left square bracket: Click to set the starting time for trimming.
Right square bracket: Click to set the ending time for trimming.
Reset: Click to reset to default values.
Horizontal Flip: Click to flip the image horizontally.
Vertical Flip: Click to flip the image vertically.
Volume slider: Drag to adjust the volume ranges from 0% to 400% of the original volume.
Trim Video
By using trim function, you can select your favorite video clips to convert at will.
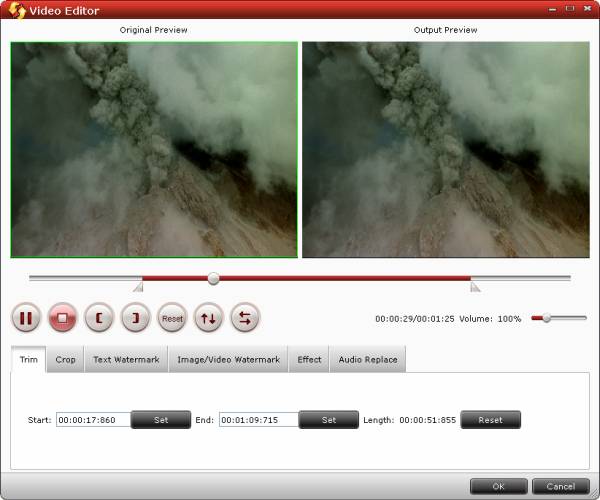
There are three ways available to trim video clips:
1. Drag the slider bars
Drag ![]() icon to mark the beginning point of your clip and drag
icon to mark the beginning point of your clip and drag ![]() to mark the end point of your clip during the preview.
to mark the end point of your clip during the preview.
2. Control mark buttons
Press the button ![]() to mark the starting point of your clip and press
to mark the starting point of your clip and press ![]() to mark the ending point of your clip during the preview.
to mark the ending point of your clip during the preview.
3. Enter time digits
Input the certain time digits into “Start” and “End” fields.
Crop Video
By using crop function, you are able to cut off black edges as well as any unwanted areas of the source video. The “Output Preview” window will show you the final effect of your modification, so you can change your adjustment in real time.

There are two ways available to crop video contents:
1. Crop by adjusting the cropping frame
You can drag the rectangle frame line on the image to crop video from different positions at will.
2. Crop by setting the values and dragging the slider bars
Type values into the boxes after “Left”, “Top”, “Width” and “Height” to crop your video. You can also drag the slider bars below the four options to customize your cropping.
Add Text Watermark
Under “Text Watermark” tab, tick off “Enable” option, and then you can type your wanted texts as watermark.

1. Check option “Enable” to edit text watermark.
2. Type the text you want to use as watermark in text watermark area.
3. You can add “Strikeout” and “Underline” effects to the text watermark by ticking off “Strikeout” and “Underline” option.
4. Drag the slider bar of “Transparence” to adjust transparence.
5. Customize “Font”, “Color”, “Size”, and “Style” of the text.
6. Drag the slider bars of “Left”, “Top” to adjust the location of the text watermark.
Add Image/Video Watermark
Click “Image/Video Watermark” button to come into the image/video watermark editing window to realize a picture-in-picture effect.
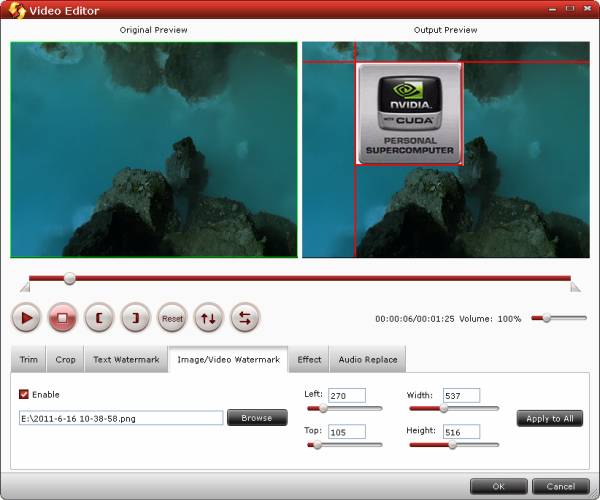
1. Check option “Enable” to edit image or video watermark.
2. Click “Browse” button to select the image or video file you want to use.
3. Set the image/video position by dragging the slider bars of “Left” and “Top”
4. Resize the height and width of the image/video by dragging the slider bars of “Width” and “Height”.
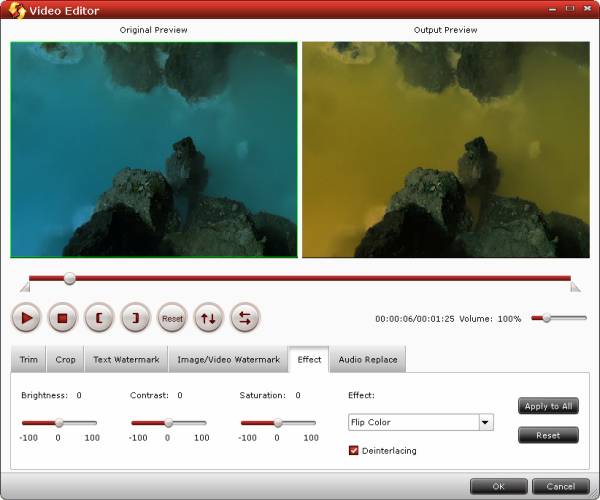
Effect
Under “Effect” tab, you can adjust the effects by adjusting the following parameters:
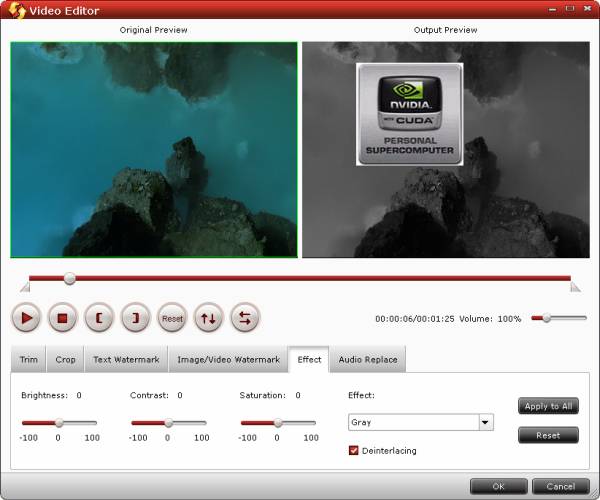
Brightness: Drag the slider bar of “Brightness” to adjust the brightness of the image/video.
Contrast: Drag the slider bar of “Contrast” to adjust the contrast of the image/video.
Saturation: Drag the slider bar of “Saturation” to adjust the saturation of the image/video.
Volume: Drag the slider bar of “Volume” to adjust the volume of the audio.
Deinterlacing: If there are some stripes on the picture, you can check this option to make a better picture effect. (Checked by default)
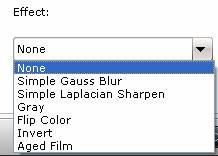
Effect: Choose a special effect from the Effect drop-down list. There are many available choices including None, Simple Gauss Blur, Simple Laplacian Sharpen, Gray, Flip Color, Invert, and Aged Film.
Following interface shows the effect of “Flip Color”:
Audio Replace
Under “Audio Replace” tab, check “Enable” option, and hit the “Browse” button to select the audio file you want to use as audio track. The “Loop” option is checked by default, if you needn’t loop, just remove the checkmark.

The Next
Set output settings
1) Choose the Output File Format and Storage Path:
The program allows you to set the output file format and the storage path. Choose the output file format from the list of “Format”, and meanwhile click “Browse” button to specify a destination folder for the final output files. The output file format will be preserved and recur as default settings automatically at next run.

2) Advanced Settings:
Click ![]() button to adjust video and audio parameters.
button to adjust video and audio parameters.

Format: You can also choose output format here on “Profile Settings” panel.
Save As: Click “Save As” to save the profile. Meanwhile you are allowed to give a name to the profile by yourself. Then you could directly find this format profile under “Custom” menu when selecting format in the main interface of this program.
Video: You can customize the video performance through adjusting codec, size, bit rate, and frame rate.
Audio: You can customize the audio performance by resetting codec, sample rate, bit rate, and audio channels.
The Next
Option
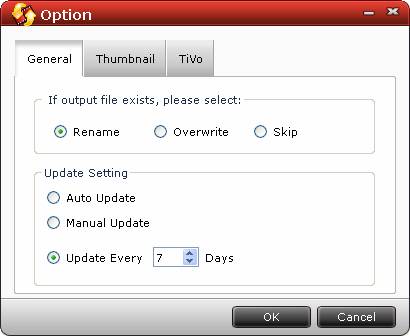
1) General Option
1. File Exists Action - Rename, Overwrite or Skip when the output file shares the same name with an existing file in the output folder.
Rename: Select “Rename” to generate a new name for present output file to avoid overwriting the existing file. The automatically generated name is formed with the existing name and orderly number.
Overwrite: Select “Overwrite” to replace existing file with present output file.
Skip: Select “Skip” to cancel converting output file that shares the same name with an existing file in the output folder.
2. Update Settings
You can choose “Auto Update”, “Manual Update” or “Update Every * Days” as update settings.
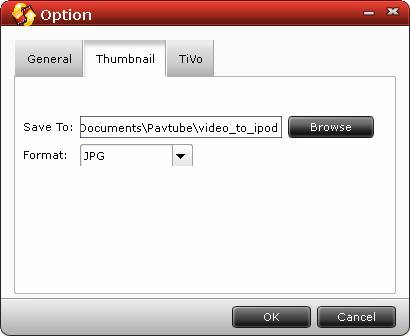
2) Thumbnail Option
Choose Output Folder: Click “Browse” button to choose the output folder for snapshot images.
Choose Format: Select output format for snapshot images.
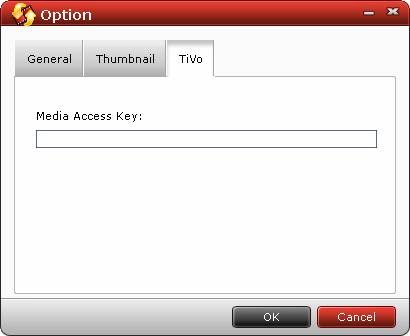
3) Enter Media Access Key Option
To import TiVo recordings into this program to do format conversion, you need enter your Media Access Key under “TiVo” panel.
Note:The option settings will be preserved and recur as default settings automatically at next run.
The Next
Convert Video
Click the big button ![]() to start video conversion. Once beginning, you will see the conversion window as below:
to start video conversion. Once beginning, you will see the conversion window as below:
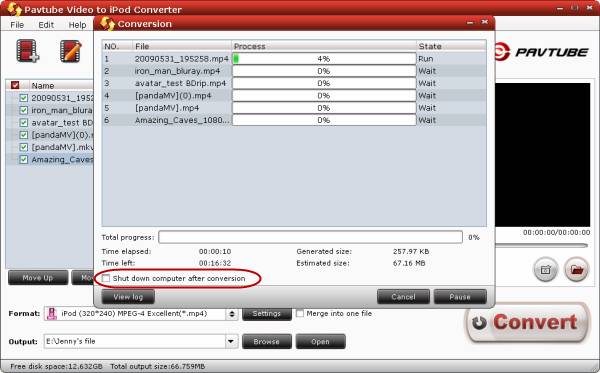
To avoid waiting around for the ripping process, you can tick off the checkbox “Shut down computer after conversion”.
The Next
Technical Support
Here is the information about how to report the problem that you encountered
Be sure that you are using the latest version of our products.
Read the FAQs carefully to search for the solution about the problem that you encountered.
If you still can not resolve the problem, please email us to support@pavtube.com. We will reply as soon as possible.
By the way, in order to solve the problem in a fastest way, please do not forget to provide the detailed information about the problem for helping us to deal with the trouble more quickly.
1. Product order number
2. The error message and log record
3. Version number of the software
4. Detailed process description about your trouble
5. Information of your operation system
For more information, you can visit our website: www.pavtube.com/support/ .
The Next
FAQ
Q: I have purchased the software but it won't take the code I have. What should I do?
A: Please remove the trial version and then download the retail version from your registration download link. Install the retail version, copy and paste your registration code to the register field. Notice that you should not leave any space before the code.
Q: I have just downloaded the new update for the software, do I need to uninstall my older version prior installing the new one or I just install the new application on top of the old one. Please advice.
A: You are encouraged to uninstall the older version in the first place. However, you might also install the new update on top of the older version.
Q: How to combine multiple video clips into one file?
A: Select the items you want to combine together and check the box of “Merge into one file” before converting the videos.
Q: My source videos (16x9) aren’t staying widescreen after conversion. I don”t want the video to be stretched and made taller. What can I do?
A: After selecting an output format, click “Settings” button and set the Video Size to 1920*1080/ 1280*720/ 854*480/ 720*405.
Q: The sound of the output file is too quiet. Can I set a larger volume?
A: You can select the chapter or title and then click the "Edit" button. Under the "Effect" tab, there is a "Volume" option. Drag the slider bar to a larger percentage. Click "OK" to save the settings. Then the output volume will be louder.
Read more FAQs.
The Next
Register
If you want to enjoy our software fully without any watermark, you may need to purchase the software. And here is information about how to register it.
After you have successfully made the purchase, a confirmation mail will be sent to your mailbox in a shot time. Please follow the instructions to download the full version of the software and get your registration code. Find details at
How to get or find back the download link and registration code of my purchased software?
Install the software onto your computer. When it launches, the Registration window will pop up. Copy and paste your registration code into the register field. Then click the registration button to activate your copy.
