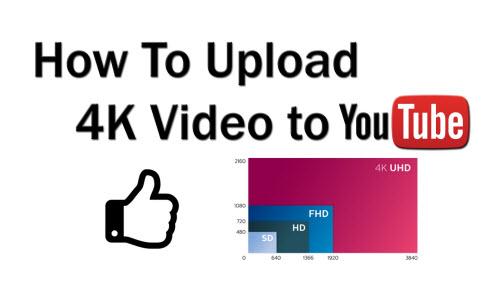
The popularity of 4K video recording devices such as 4K cameras and mobile devices make it pretty convenient for us to produce 4K content on our own. To share our great work with people around the world, more people choose to upload the 4K video onto YouTube, one of the most popular video sharing sites. The following article will share you some tips and tricks to smoothly upload any 4K video to YouTube with best quality and effect.

Can YouTube support 4K video uploading?
YouTube enabled support for 4K video on its site back in 2010, and in 2016, it's bringing that same capability to live streaming. Both standard videos and 360 videos will be able to be live streamed in 4K. However, to achieve a smooth uploading process and also a perfect upload quality, you should be clear what's the best 4K format and settings for YouTube uploading.
Best 4K video format for YouTube
Following are the YouTube recommended 4K uploading video/audio format
Container: MP4
Video codec: H.264
- Progressive scan (no interlacing)
- High Profile
- 2 consecutive B frames
- Closed GOP. GOP of half the frame rate.
- CABAC
- Variable bitrate. No bitrate limit required, though we offer recommended bit rates below for reference
- Chroma subsampling: 4:2:0
Audio codec: AAC-LC
- Channel: Stereo or Stereo + 5.1
- Sample rate 96khz or 48khz
If the 4K video are with the format of AVI, WMV, MKV, MXF, AVCHD, H.265, you can download a powerful 4K video converter such as Pavtube Video Converter for Windows/Mac to convert the incompatible 4K video to YouTube best favorable 4K H.264 High Profile video.
Hot Topic: Fix YouTube Not Uploading | Upload H.265 to YouTube | 4K Video Recording Devices
Best uploading settings for YouTube 4K video
Obviously, a proper file format is not enough to ensure a smooth and successful YouTube uploading process, you should also pay much attention to other YouTube uploading settings such as the suitable video bit rate, frame rate and audio bit rate, sample rate, channels or other YouTube recommended settings, the following article will listed them one by one for you.
Frame rate
Content should be encoded and uploaded in the same frame rate it was recorded.
Common frame rates include: 24, 25, 30, 48, 50, 60 frames per second (other frame rates are also acceptable).
Interlaced content should be deinterlaced before uploading. For example, 1080i60 content should be deinterlaced to 1080p30, going from 60 interlaced fields per second to 30 progressive frames per second.
Bit rates
Recommended 4K video bitrates for SDR uploads
|
Type |
Video Bitrate, Standard Frame Rate(24, 25, 30) |
Video Bitrate, High Frame Rate(48, 50, 60) |
|
2160p (4k) |
35-45 Mbps |
53-68 Mbps |
Recommended video bitrates for HDR uploads
|
Type |
Video Bitrate, Standard Frame Rate(24, 25, 30) |
Video Bitrate, High Frame Rate(48, 50, 60) |
|
2160p (4k) |
44-56 Mbps |
66-85 Mbps |
Recommended audio bitrates for uploads
|
Type |
Audio Bitrate |
|
Mono |
128 kbps |
|
Stereo |
384 kbps |
|
5.1 |
512 kbps |
Resolution and aspect ratio
YouTube uses 16:9 aspect ratio players. If you're uploading a non-16:9 file, it will be processed and displayed correctly as well, with pillar boxes (black bars on the left and right) or letter boxes (black bars at the top and bottom) provided by the player.
If the 4K video that you plan to upload to YouTube don't comply with the standards listed above, you can still take good advantage of our program - Pavtube Video Converter to adjust those settings in the program's profile settings window to make them the same as the settings listed above.
How to Output the Best 4K Uploading Settings for YouTube?
Step 1: Import 4K video into the program.
Start the program on your computer, click "File" > "Load Video/Audio" or "Load from folder" button to import unsupported 4K video files into the program. You also can load 4K footage by other 4K recording devices.

Step 2: Output YouTube best compatible 4K format.
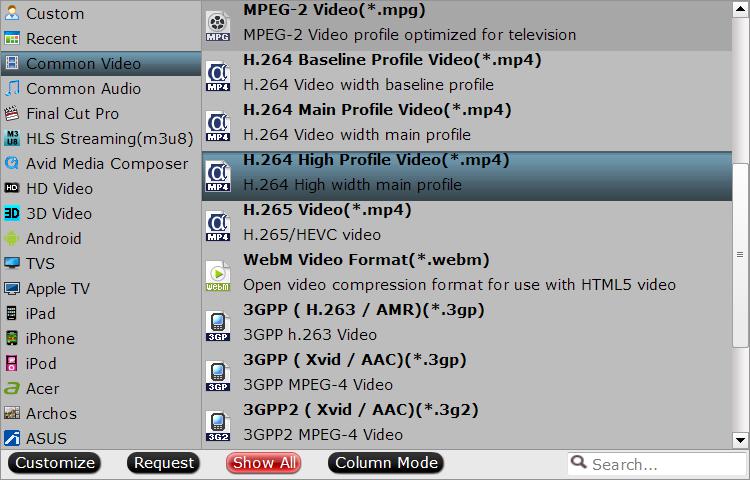
Click "Format" bar, from its drop-down options, choose YouTube best compatible 4K format from "Common VIdeo" > "H.264 High Profile Video(*.mp4)".

Step 3: Customize output profile parameters.
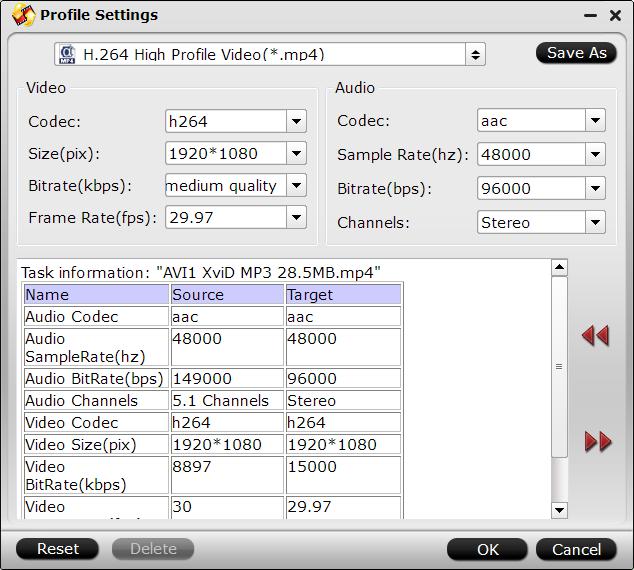
Click "Hit "Settings" to open the "Profile Settings" window, here you can adjust the output video codec, resolution, bit rate, frame rate and audio codec, bit rate, sample rate and channels to let them fit them YouTube.

Step 4: Start the conversion.
Start 4K video to YouTube best format and settings conversion by hitting the right bottom convert button, when the conversion is over, you will have no limitation to upload and share 4K videos on YouTube.
Useful Tips
- How to Flip or Rotate Videos using Handbrake?
- Play Tivo Recordings with Windows Media Player
- How to Use VLC to Convert AVI to MP4 on PC/Mac?
- MOV Compressor: How to Compress MOV to a Smaller Size on Windows/Mac?
- Stream 4K Video to Chromecast Ultra via Plex
- Get Chromebook Pro/Plus to Play MKV Files without Any Problem


 Home
Home

 Free Trial Video Converter


