
 Home
HomeDo your have some lengthy MP4 video files and wish to trim the blank content in the beginning and end of the video or you just record a MP4 video with your camera/camcorder and look for a way to cut out the shaky or unwanted parts before sharing the video footage with family members or friends. When searching on the Internet for MP4 video joiner software, you may find that there are many free options, however, a lot of them can't do the work very well just as below:
"I've got a number of MP4 files encoded via Handbrake into a nice high-quality but compact H.264 format, however there are some parts I'd like to trim. In the past I've used MPEG StreamClip, but it doesn't cope with these files at all, either corrupting the start of trimmed clips or not trimming to exactly my selection."
"I have a h264 video in mp4 container. I want to cut some portions of the video without re-encoding. I tried virtualdub but it does not recognise the file type . Please suggest any other software to do it."
"I have some anime episodes and I want to cut the intro and the ending. The problem is that the intro doesn't appear until minute 5 more or less. I tried using Yamb but it did not cut anything. What can I use?"
Best tool to trim MP4 video without re-encoding
Although some free applications claim to have the ability to join MP4 video files, however, you may find that some even not recognize the MP4 files imported to it, some don't trim the part you want, others require you to perform a video codec transocoding process after the trimming process. Are there any program that's capable of trimming MP4 files encoded with various different video and audio codec without re-encoding to another format? Fortunately, here comes Pavtube Video Converter (review), which has wide range support for all MP4 files encoded with the following video and audio codecs:
Video codec: MPEG-1, MPEG-2, MPEG-4 (A)SP, H.264/MPEG-4, H.265/HEVC, VC-1/WMV, Real Video, Theora, Microsoft MPEG4 V2, VP8, MVC
Audio codec: MP3, WMA, AAC, AC-3, DTS,ALAC, DTS-HD
You can use the program to easily trim or cut unwanted parts from MP4 video by setting the starting point and ending point. If you don't want to re-encoding the video, just choose to output a file format encoded with the same codec as your original MP4 video.
Besides trimming MP4 video without quality loss, you can also use the program to do other simple video editing. You can flip video horizontally or vertically, rotate video clockwise or counterclockwise to get it displayed in the right angle, crop video to cut off unwanted black borders or area, personalize video with video/image/transparent text watermark, split large video into small parts by file size, count or length, merge separate video clips into one, adjust picture effect like brightness, contrast, saturation or apply special rendering effects like Gray, Flip Color or Aged Flim, etc to your video or add external SRT/ASS/SSA subtitles to video.
For Mac users, please turn to download Pavtube Video Converter for Mac (review) to trim or cut mp4 files on macOS Sierra.


Step by step to Trim or Cut MP4 Files without Re-encoding
Step 1: Input MP4 video files into the program.
Start this video trimmer application on your computer, on the main interface, click the "Add Video" or "Add from folder" button to load source MP4 files into the program. The program supports batch conversion mode, you can load multiple files to convert at one time.

Step 2: Save the video as the original file format.
To trim or cut video without re-encoding or quality loss, you can choose to save the video as the original file format with all the output profile parameters unchanged. For example, if the original file format is H.264 HD MP4, just select to output the same format as it is.

Step 3: Trim/Merge/Crop/Watermark/Subtitle video.
Trim: Open "Video Editor" window and switch to the "Trim" tab, you can drag the slider bars to include the segment you want to remain, click the left square bracket to set start point, and click the right square bracket to set end point when previewing the video or directly input specific values to "Start" and "End" box.

Merge: On the main interface, check  option to combine all your separate video clips into one single file.
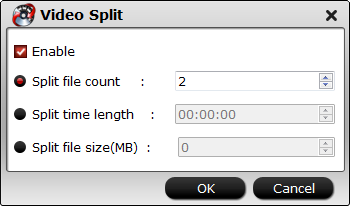
Split: On the main interrface, click the "Split" button under file list to launch the "Video Split" window. Checking "Enable" to enable it, and then you can split the file by file count, time length, or file size.
Step 4: Start the MP4 video trimming/cutting process.
Clicking the right-bottom "Convert" button on main interface, you can go to Conversion window to start conversion. You can find conversion information on the window, such as Time elapsed, Time left, Generated size, and Estimated size.
After the conversion, you can click "Open Output Folder" to pop output directory with the files with just you wanted parts or segments.
 Free Trial Video Converter

Useful Tips
- How to Flip or Rotate Videos using Handbrake?
- Play Tivo Recordings with Windows Media Player
- How to Use VLC to Convert AVI to MP4 on PC/Mac?
- MOV Compressor: How to Compress MOV to a Smaller Size on Windows/Mac?
- Stream 4K Video to Chromecast Ultra via Plex
- Get Chromebook Pro/Plus to Play MKV Files without Any Problem


