After finishing your editing work in Adobe Premiere Pro, before uploading your great work to share with people around the world on YouTube, Vimeo, there is still an import step that you should not underestimate: Exporting the project from Premiere Pro. For those people who wish to export video at 4K resolution for YouTube/Vimeo sharing, you can easily run into errors when you try to increase the resolution of your video during the export stage. To avoid those errors, you can change the settings described in below article:
Generally, the ideal uploading format for YouTube is H.264.
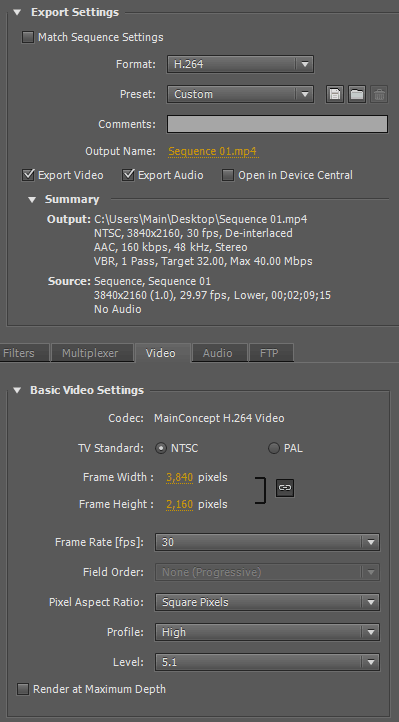
- Change Profile to "High"
- Change Level to "5.1"
- Adjust Frame Rate to "30" or less
- Change Pixel Aspect Ratio to "Square Pixels" if necessary
- Change Frame Width to "3840" and Frame Height to "2160"
(If Aspect Ratio Lock is on, the Frame Height may adjust automatically. You can uncheck the Lock and adjust each one manually if you need to)
After above changes, your export dialog should resemble (export file name, bit rate and other settings may be different):
Produce best 4K settings for YouTube uploading with Premiere Pro alternative
Besides using Premiere Pro to export 4K settings for YouTube uploading, there are also some simple alternative tools for you to achieve that. The program I highly recommended here is Pavtube Video Converter (get Mac version), the program not only facilitates you to convert all incompatible file formats to YouTube best uploading H.264 MP4 file formats, but also does you a great favor to adjust the output profile settings including video codec, bit rate, frame rate, resolution and audio codec, bit rate, sample rate and channels to YouTube best uploading encoding settings.
Apart from that, as YouTube uses 16:9 aspect ratio, if your video is not with that aspect ratio, you can rechange the aspect ratio to 16:9 under the "Crop" tab. In addition, YouTube has both limitation on file size and video lenght, if your video is larger than 2GB, you can reduce the file size with no quality by splitting large video into small clips by file size, count or length or shorten video length by trimming or cutting off video unwanted parts or segments.
Step by Step to Export Best 4K Settings for YouTube Uploading with Pavtube Video Converter
Step 1: Input source video to the program.
Launch the program on your computer, click "File" menu and select "Add Video/Audio" or "Add from folder" to import source videos to the application.
Step 2: Output Youtube best uploading format for 4K video.
Click "Format" bar, from its drop-down options, choose YouTube best compatible uploading format from "Common VIdeo" > "H.264 High Profile Video(*.mp4)".
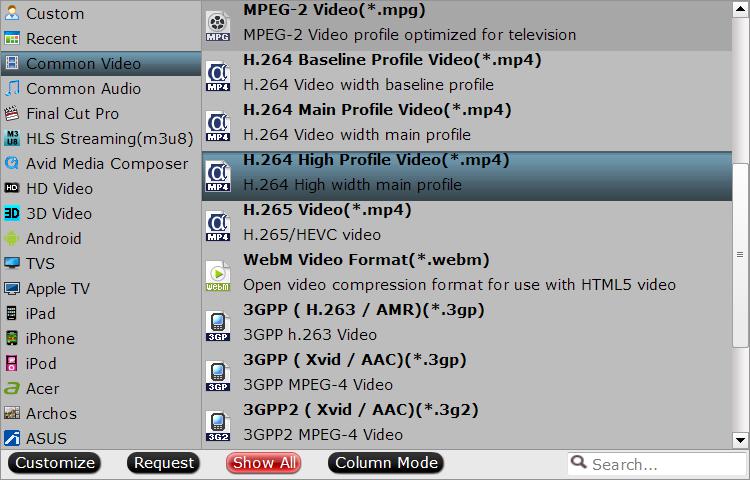
Step 3: Tweak encoding settings for YouTube upload.
Click "Hit "Settings" to open the "Profile Settings" window, here you can adjust the output video codec, resolution, bit rate, frame rate and audio codec, bit rate, sample rate and channels to let them fit them YouTube.
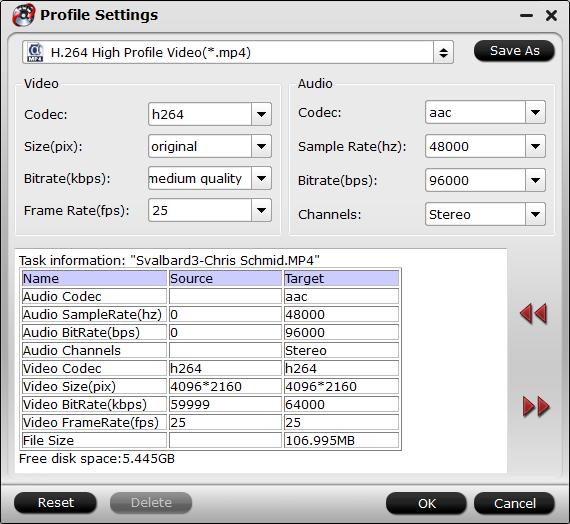
Step 4: Trim or split video.
Trim video
Select an item on the main interface to activate the "Video Editor" function, in the opened video editor window, click the "Trim" tab, you can drag the slider bars to include the segment you want to remain, click the left square bracket to set start point, and click the right square bracket to set end point when previewing the video or directly input specific values to "Start" and "End" box.
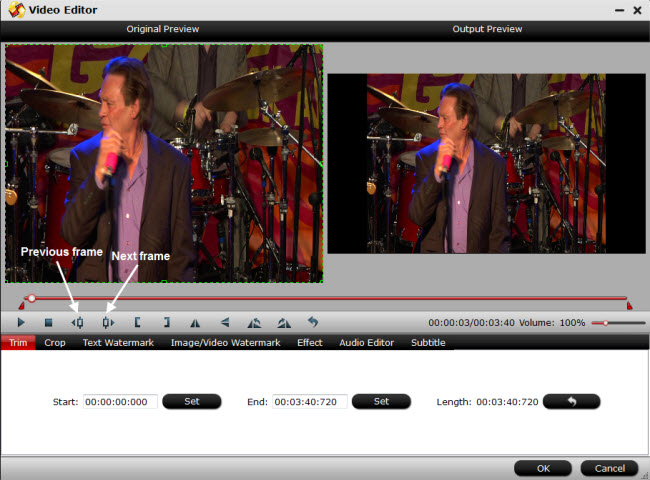
Split video file size
By clicking the "Split" button on file list, or from "Edit" menu, you can launch the "Video Split" window. Checking "Enable" to enable it, and then you can split the file by file count, time length, or file size.
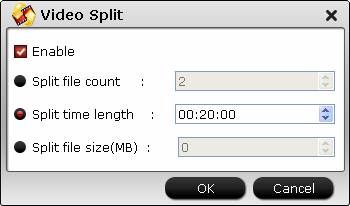
Step 5: Start the conversion.
Start video to YouTube best upload format and settings conversion by hitting the right bottom convert button, when the conversion is over, you will have no limitation to upload and share any video on YouTube with fast speed and perfect quality.
Useful Tips
- How to Flip or Rotate Videos using Handbrake?
- Play Tivo Recordings with Windows Media Player
- How to Use VLC to Convert AVI to MP4 on PC/Mac?
- MOV Compressor: How to Compress MOV to a Smaller Size on Windows/Mac?
- Stream 4K Video to Chromecast Ultra via Plex
- Get Chromebook Pro/Plus to Play MKV Files without Any Problem


 Home
Home Free Trial Video Converter


