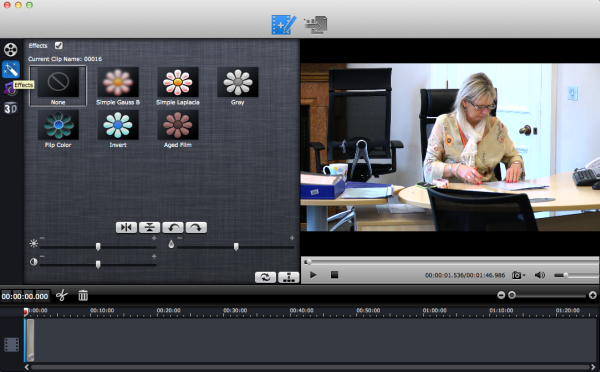
There are mainly two types of editing. One is clip editing on timeline like trimming, cutting, deleting, rearranging orders, and merging. And the other one is effects and adjustments editing which does not take effect on lossless output.
Clip editing on timeline
In this section, you can preview, trim, cut, delete, rearrange order, and merge & join.
Notes: Actions in this section can take effect if choosing lossless output formats.
1. Drag & drop clips from resource list to timeline. (To select multiple clips on list, you can press Command Key and click.)
2. Zoom in & out: Drag the bar on top-right of timeline to Zoom in or out for better view.
3. Preview: Highlight a clip on timeline and click Play button, you can preview.
4. Trim: Put your cursor to the start or end point of a clip on timeline until it changes to trimmer. Drag the trimmer and you can trim off unwanted starting or ending.
5. Cut: Drag the pointer to the right place; Put your cursor to process bar under preview window and select the right frame; Click the Scissors button and you can cut the clip. And then you can rearrange order or delete.
6. Delete: Highlight the unwanted clip on timeline, and click Delete button. You can also delete it with right-click menu.
7. Rearrange order: Drag and hold a clip to the right place until the place line shows. Drop the clip and it will be placed right there.
8. Merge & join: All files placed on timeline will be output as one file. So if you want to merge and join several clips, just drag them to timeline with the right order.
Effect and adjustment editing

In this section, you can add 3D and special effects to the video clips and adjust video and audio.
Note: Actions in this section will not take effect while choosing lossless output formats.
Add Effects:
You can add special effects like Simple Gauss Blur, Simple Laplacla, Gray, Flip Color, Invert, and Aged Film; flip videos vertically, horizontally, clockwise, or counter-clockwise; And adjust video brightness, contrast, and saturation here.
1. Go to Special Effect tab, and highlight the clip you want to add special effect on.
2. Click on the special effects and preview it in real-time.
3. Click on right buttons, and you can flip videos vertically, horizontally, clockwise, or counter-clockwise.
4. Dragging the bars and you can adjust video brightness, contrast, and saturation.
5. You can also click on the buttons on bottom-right of this section to reset or apply the settings to all clips on timeline.
Volume Adjustment:
1. Go to Volume Adjustment section, dragging the bar you can enlarge or reduce volume of the selected clip.
2. Clicking the buttons on bottom-right you can reset or apply the setting to all clips on timeline
3D Effect:
1. Go to 3D Effect tab and tick 3D Effect option.
2. You can click to choose the right style of 3D effect and drag the bar to set depth.
3. Clicking the buttons on bottom-right you can reset or apply the setting to all clips on timeline
Conversion Settings:

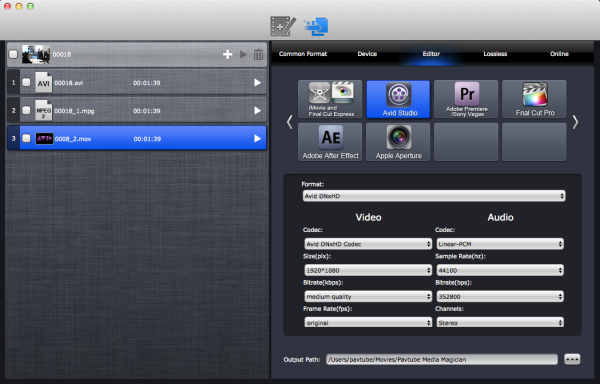
Go to the second tab on top of the application, you can set conversion tasks, formats, output path, YouTube account info, etc.
1. Add conversion tasks: Click on the “+” button on main task bar to add conversion tasks.
2. Set output format: Highlight a task on the task list, and choose the right format preset from relative tab on the right. You can set different formats to tasks on list.
3. Set format parameters: After selecting the right output format preset, you can also customize parameters if needed, such as video frame rate, video bitrate, audio bitrate, sample rate, etc.
4. Set output path: On bottom of the right column, you can find Output Path box where you can set the output destination for the converted video files.
5. Choose tasks for conversion: Before starting the conversion, you can tick to choose the right task for output. Clicking the triangle button on the main task bar, you can start the batch conversion.
Files placed on timeline will be output as one file to the formats you select.
6. In process of conversion, you can still add tasks, delete tasks, pause conversion tasks, etc. with the buttons on task bars or right-click menu.
7. After all conversion tasks, you can find the converted files with right-click menu on relative task bars.
Output Formats:
Common Format: AVI, MPEG-2(*.mpg), MPEG-4 (*.mp4), WMV, MOV, MKV, M2TS
Device: Android (format presets for Android tablets and smart phones), Windows (format presets for Windows 8 RT tablets and smart phones), iPad, iPhone, Apple TV, HD Player, PSP/PS 3, HDV
Editor: iMovie and Final Cut Express (AIC MOV), Avid Studio (Avid DNxHD MOV. It’s not available in App Store version.), Adobe Premiere and Sony Vegas (WMV, MPG, or MOV), Adobe After Effect, Apple Aperture, Final Cut Pro (Apple ProRes MOV. It’s not available in App Store version.)
Lossless: Original (MTS), MKV (Please note that lossless output only works for MTS source files.)
Online: YouTube (MP4 and WebM. Here you can insert account info and set video descriptions.)
Notes:
a. Mac App Store version does not have Avid Studio and Final Cut Pro categories. You can contact macsupport@pavtube.com with your order info for official version. It’s is free to change.
b. Lossless output only works for MTS original files, and the files placed on timeline should be with the same codecs.
[Related Links]


 Home
Home


