How to Backup/Burn Your iTunes Media to CD or DVD
I used to put the music and movies of iTunes’ onto my iPod, but as the quantity of media increases, backing up iTunes media is becoming more and more necessary; what’ more, I will use the iTunes media on my laptop, so I want to burn the library and purchases to CD or DVD which can keep long and safe for my valued media.
iTunes7 or later provides a way to backup/burn iTunes library and iTunes Store purchases for safekeeping. This feature will save the space of the computer and automatically restore iTunes library with the backup discs.
iTunes can also perform incremental backups (Only backup items added or changed since the last backup). This is affected for both Windows and Mac. I will show the process of backup, hope it can help you.
Install a DVD burner (compatible with the CD burning function)
To burn a DVD (DVD-R or DVD-RW) or CD (CD-R or CD-RW), the computer must have a compatible DVD burner, including the CD burning function, you can check in iTunes Preferences to see whether a drive is compatible or not.
1. Open iTunes Preferences:
Mac: From the iTunes menu choose Preferences.
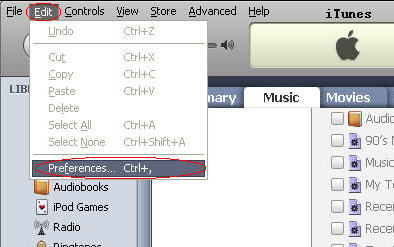
Windows: On the Edit menu click Preferences.

2. Click Advanced.
3. Click Burning.
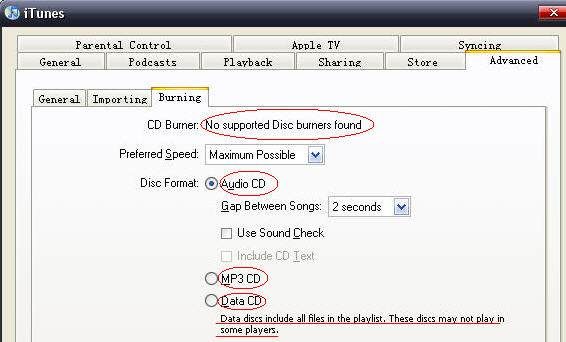
4. If the drive is listed, it's compatible; if not, it shows No supported Disk burner found.
Note: For Disc Format, you can choose Audio CD, MP3 CD, or Data CD. Both Audio CD and MP3 CD can be played in CD player, but Data disc include all files in the playlist (video, audio, etc), and these discs may not play in some players.
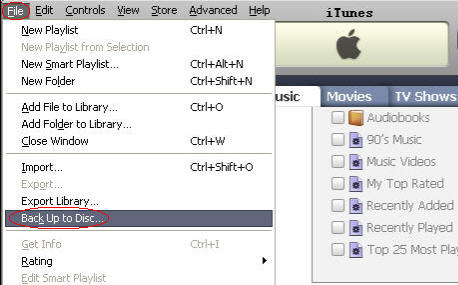
Then you can choose the Back Up to Disc from the File menu; select the option you want from the pop-up dialog and click Back Up to make sure you have the DVD/CD burner on your computer.


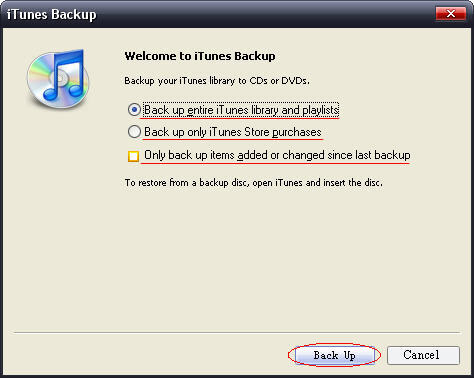
Back up entire iTunes library and playlists
Back up only iTunes Store purchases
Only back up items added or changed since last backup
Note: All the three options you can choose and you need to note that the third choice is for you to perform an incremental backup.
Burn/backup to DVD/CD
1. Insert a blank disc (CD or DVD) into your computer's drive then iTunes will scan the disc and begin burning.
Note: If the disc you inserted does not have enough space to hold all of the media to back up, a dialog will appear asking whether you wish to backup to multiple discs. You can click Data Discs to continue.
2. iTunes burns the number of items that fit on one disc and then asks you to insert subsequent discs to continue burning the remaining files.
Note:
1). Do not eject a disc while it is backing up.
2). Spoken programs purchased from the Audible.com are not backed up.
3). Discs you burned can be only used to restore (except the MP3 CD format and Audio CD format), not be played in a CD or DVD player.
Restore from a burned disc
1. Open iTunes.
2. Insert your burned disc.
3. iTunes will ask whether you want to restore from this disc; then click Restore, and media will be restored on your iTunes library.
iTunes7 or later provides a way to backup/burn iTunes library and iTunes Store purchases for safekeeping. This feature will save the space of the computer and automatically restore iTunes library with the backup discs.
iTunes can also perform incremental backups (Only backup items added or changed since the last backup). This is affected for both Windows and Mac. I will show the process of backup, hope it can help you.
Install a DVD burner (compatible with the CD burning function)
To burn a DVD (DVD-R or DVD-RW) or CD (CD-R or CD-RW), the computer must have a compatible DVD burner, including the CD burning function, you can check in iTunes Preferences to see whether a drive is compatible or not.
1. Open iTunes Preferences:
Mac: From the iTunes menu choose Preferences.
Windows: On the Edit menu click Preferences.

2. Click Advanced.
3. Click Burning.
4. If the drive is listed, it's compatible; if not, it shows No supported Disk burner found.

Note: For Disc Format, you can choose Audio CD, MP3 CD, or Data CD. Both Audio CD and MP3 CD can be played in CD player, but Data disc include all files in the playlist (video, audio, etc), and these discs may not play in some players.
Then you can choose the Back Up to Disc from the File menu; select the option you want from the pop-up dialog and click Back Up to make sure you have the DVD/CD burner on your computer.


Back up entire iTunes library and playlists
Back up only iTunes Store purchases
Only back up items added or changed since last backup
Note: All the three options you can choose and you need to note that the third choice is for you to perform an incremental backup.
Burn/backup to DVD/CD
1. Insert a blank disc (CD or DVD) into your computer's drive then iTunes will scan the disc and begin burning.
Note: If the disc you inserted does not have enough space to hold all of the media to back up, a dialog will appear asking whether you wish to backup to multiple discs. You can click Data Discs to continue.
2. iTunes burns the number of items that fit on one disc and then asks you to insert subsequent discs to continue burning the remaining files.
Note:
1). Do not eject a disc while it is backing up.
2). Spoken programs purchased from the Audible.com are not backed up.
3). Discs you burned can be only used to restore (except the MP3 CD format and Audio CD format), not be played in a CD or DVD player.
Restore from a burned disc
1. Open iTunes.
2. Insert your burned disc.
3. iTunes will ask whether you want to restore from this disc; then click Restore, and media will be restored on your iTunes library.
Pavtube DVD to iPod Converter is professional all-in-one and easy-to-use DVD to iPod software. It can rip DVD to MP4, DVD to H.264, MP3, WAV, M4A, and AAC; perfectly help you convert DVD to iPod classic, iPod nano, iPod shuffle, iPod touch, iPod mini, iPod U2, etc.


