The Canon XC10 4K camcorder features a compact, lightweight and versatile design for convenient 4K/Full HD video shooting. The camcorder can record H.264 4:2:2/8-bit MXF 4K (QFHD) 3840 x 2160 movies to internal CFast cards or Full HD 1920 x 1080 video to SD cards at multiple frame and bit rates (up to 305Mbps in 4K).
Work XC10 4K MXF with iMovie
When the shooting is over, for Mac users, you can do some video editing work with Apple’s default but free video editing software - iMovie. Although latest version of iMovie for Mac is capable of handle 4K video editing, however, it does not mean you can import 4K video with any format to iMovie for editing. And the sad news here is MXF format recorded with Canon XC10 is excluded in iMovie supported file formats list: MPEG-4, QuickTime Movie (.mov), MPEG-2, AVCHD, DV & HDV.
Best workflow of XC10 4K MXF With iMovie
To import Canon XC10 4K MXF to iMovie, the best solution is transcoding MXF to iMovie readable file formats listed above. To assist you get a fast and fluid workflow, we would recommend you to wrap XC10 MXF to Apple Intermediate Codec (AIC), an intermediate format which features high performance and quality with HD editing workflow in iMovie and Final Cut Express. To generate AIC codec from MXF format, you can download Pavtube HD Converter for Mac - best Mac MXF Converter to convert not only Canon MXF but also Sony/Panasonic P2 MXF files to iMovie best favorable AIC editing codec with just one click.
Trim/Merge/Split/Crop MXF files
Before loading the files into iMovie, you can do some basic video editing work with the program’s built-in video editing tools. You can trim the video to cut off your unwanted parts, rearrange the video in the right order and merge all the separate video into one single file, split large mxf video into small parts by file size, count or number or crop MXF file to remove the black bars around the video.
How to Transcode and Import Canon XC10 4K MXF to iMovie?
Step 1: Add MXF files to the program.
Download and install the program on your Mac computer, on the main interface, click the video or folder icon on the top tool bar to load MXF files into the program.

Step 2: Choose output file format.
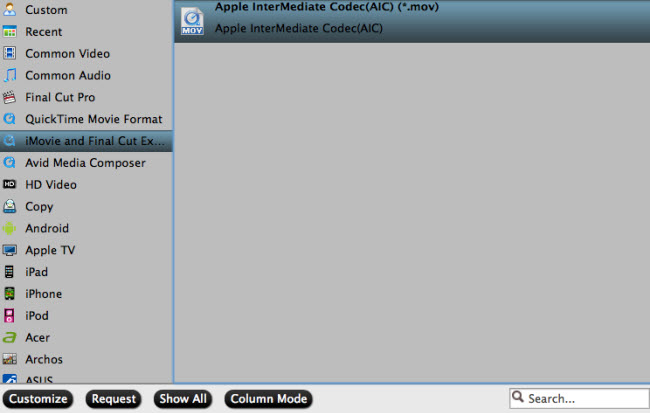
From "Format" drop-down option, choose iMovie best video editing codec from "iMovie and Final Cut Ex..." > "Apple Intermediate Codec (AIC)(*.mov) to output.

Step 3: Edit Canon XC10 4K MXF files.
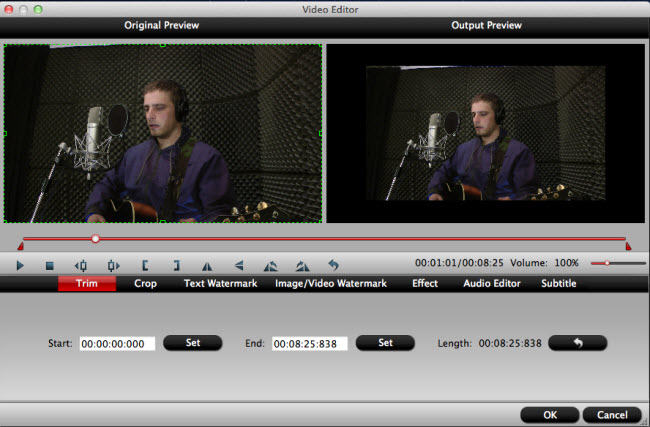
Select an item to activate the "Edit" menu, on the "Video Editor" Window, you can play and preview the original video and output effects. Also you can flip video, trim, add special effect, reset, and adjust volume.

Step 4: Start the conversion process.
After all the setting is over, go back to the main interface and hit right-bottom "Convert" button to start to convert XC10 4K MXF video to iMovie best compatible AIC format.
When the conversion is completed, launch iMovie on your Mac computer to import XC10 MXF to iMovie for smooth editing workflow.
Useful Tips
- Review of 5 Best HD Video Converter for Mac (macOS Sierra Included)
- Import DJI Mavic Pro 4K video to iMovie for Editing
- Import DivX to iMovie (iMovie 11 Included)
- How to Convert ASF to iMovie (iMovie 11 Included) on Mac?
- Superior iMovie Alternatives for Mac (MacOS Sierra)
- 2017 Top 5 Best HD Video Converters for Mac OS X El Capitan/Yosemite/Mavericks


 Home
Home Free Trial HD Video Converter for Mac


