
This article helps you figure out problems like “Cannot import Blu-ray and DVD movies to Wii” and “Wonder how to play Blu-rays and DVDs on Nintendo Wii console” with a professional Wii utility called Pavtube Blu-ray DVD to Wii Ripper for Mac. The program is capable of ripping both Blu-ray discs and standard DVDs to a format that is compatible with Wii console, such as Wii MOV and Wii AVI. With full supports for BD and DVDs, it is good at cracking AACS and BD+ copy protection from a Blu-ray disc, and CSS encryption from general DVDs. Best of all, it offers super high conversion speed and excellent output file quality, which keep you far away from audio/video out of sync issues and image artifacts. Go to find a detailed guide about how to rip Blu-ray and DVD to Wii on Mac from the following contents.
Step-by-step guide: How to rip Blu-ray and DVD to Wii on Mac?
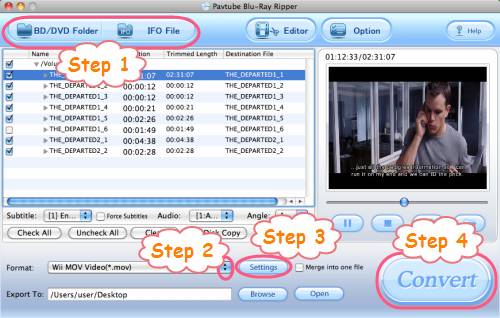
Step 1: Run Pavtube Blu-ray DVD to Wii Ripper for Mac, install and launch it.
Once run it, you can click “BD/DVD Folder” to load Blu-ray and DVD movie files. Please notice that “IFO File” icon only enables you to import standard DVD files, not BD movie files.
Step 2: Select output format for Wii console
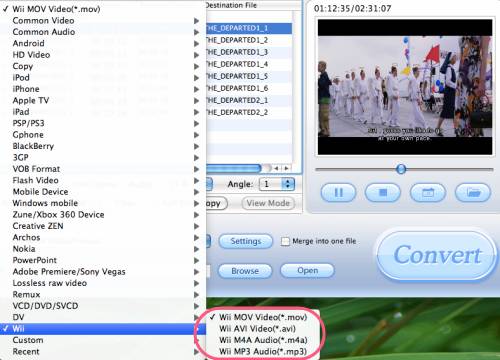
Click on the pull down menu at the opposite side of “Format”, and then hit “Wii” preset, afterwards you will see the interface as below. All the formats optimized for Wii are listed out. You can rip Blu-ray and DVD to Wii MOV, or rip Blu-ray and DVD to Wii AVI, or extract movies audios to Wii M4A or Wii MP3.
Step 3: Adjust video and audio parameters
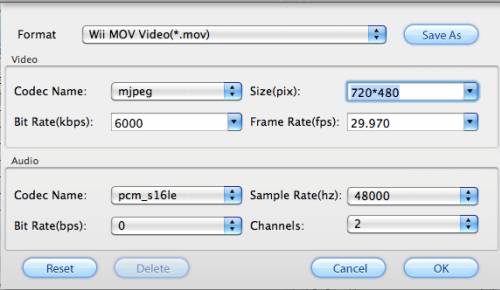
Click “Settings” button, then the following window will pop up, on which you are allowed to adjust audio and video settings to optimize file quality for your Wii console. These adjustable settings include codec name, aspect ratio, bit rate, frame rate, sample rate, and audio channel.
Step 4: Get ready to rip Blu-ray and DVD to Wii on Mac
Click the big button “Convert” to rip Blu-ray and DVD to Wii with Pavtube Blu-ray DVD to Wii Ripper for Mac. Once the ripping work is finished, you can click “Open” button to get the resulted files with ease.
Additional info:
How to select your desired subtitle and audio track when rip Blu-ray and DVD to Wii on Mac?
1. Select subtitle
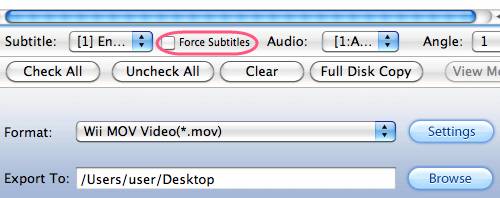
Click the drop-down list of “Subtitle”, then all the subtitle info in the Blu-ray will be shown clearly, including language and stream ID, so you can select your needed language as your subtitle.
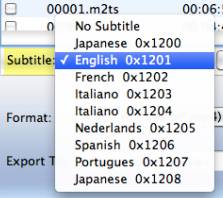
In addition, Pavtube Blu-ray DVD to Wii Ripper for Mac also offers an option called “Force Subtitle”. When you check “Force Subtitle”, you will see subtitles only when actors are speaking another language that is not your mother tongue. For instance, if you specify English (your mother tongue) as your subtitle, and meanwhile tick off “Force Subtitle” option, then when actors are speaking English, no subtitles will show up, but when they are talking with each other in French, the English subtitle will appear accompanying with the French.
2: Select audio track
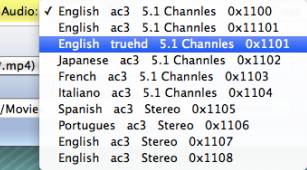
Click the pull down menu of “Audio”, and then the list will give you the detailed information of audio tracks, including language, audio codec, stream ID and audio channel. TrueHD audio and DTS-Master Audio are both supported.


 Home
Home Free Trial Blu-ray Ripper for Mac


