Many early digital still cameras, especially those manufactured by Canon, are capable of shooting a limited amount of video and saving the footage as an MVI file. MVI is actually certain type of AVI format. You may find it is neither supported by Windows Media Player, nor be edited in most editing software. However, chances are that you want to trim off certain part of the MVI file and insert the MVI files to PowerPoint for presentation. Well, if you are caught in this problem, Pavtube Video Converter might help you out. The converter, which is fairy powerful in converting videos of various formats for PPT, Adobe Premiere, Sony Vegas and universal portable media players like iPod, iPhone, Blackberry, Creative Zune, PSP and now even works with iPad, is proved to be a great MVI to PPT Converter. See below how to convert MVI to PPT compatible format and insert the clip to Powerpoint.
Part 1. Convert the MVI files to be compatible with PPT.
You shall download and install trail version of Pavtube Video Converter for converting MVI to PPT in advance.
Step 1. Import MVI files to Pavtube Video Converter.
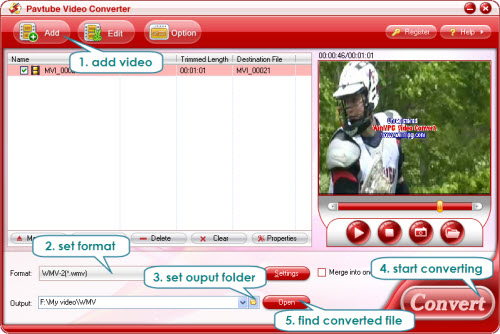
Run the app and click "Add" button to import MVI files to the app (or simply drag and drop the source files into file list.) Double-click on it if you’d like to preview a file or take some snapshots.

Step 2. Set output format to be compatible with PowerPoint
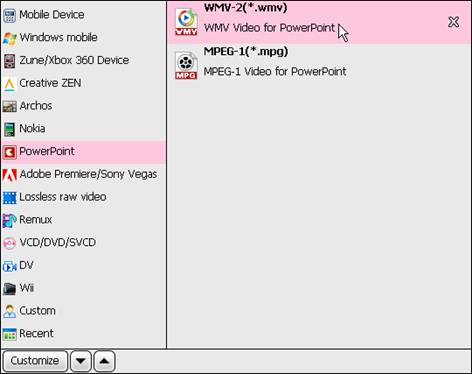
Click the format bar and choose an appropriate format for output to PowerPoint. Follow PowerPoint-> WMV-2 (*.wmv) or MPEG-1 (*.mpg). You may also compress the file to save space by clicking “Settings” and set a smaller value in bitrate box.

Step 3. Specify output location for saving converted files
Click the small folder icon and browse to desired folder you would like to save the converted files.
Step 4. Convert MVI to WMV format
When all these are done, you can click "Convert" button to start. If you’d like to put some MVI clips into one file, please check the box “Merge into one file” before clicking “Convert”. In case that you need part of the clip, select the file and click “Edit” menu, then you can trim the video to any length under Trim tab and cut off unwanted part.
Step 5. Find the converted file
Click the “Open” button and the app will open the folder that contains converted files. Now the files are ready to be inserted to PowerPoint.
Part2. Add video to your PowerPoint.
Step 1. Open the PowerPoint file, within which you want to add the video.
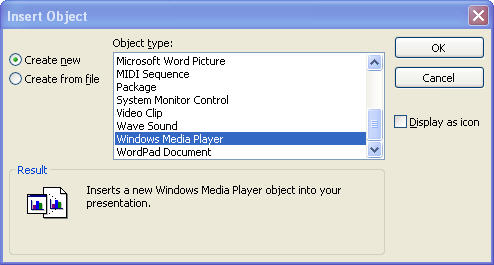
Step 2. Click on a slide, which you want to display the video, and then choose Insert-> Object.
Step 3. Choose "Windows Media Player" as the object type in the pop-up "Insert Object" window.

Step 4. Right-click on the player widget, and choose "Properties".
Step 5. Enter the right path of the output video for the "URL" option.

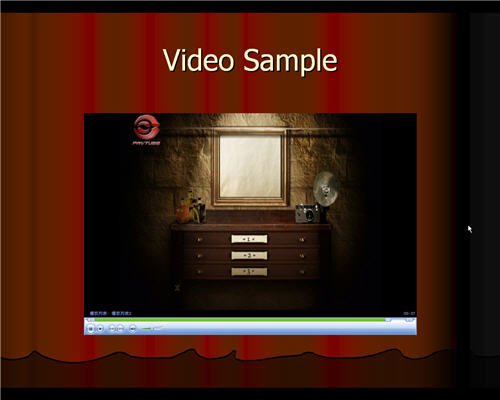
Then you can show the clips on PowerPoint with small file size.
Useful Tips
- The complete Blu-ray/DVD Backup Solutions for Mac OS X
- Import footages/videos/projects into Final Cut Pro X without rendering
- How to Play MXF with VLC?
- Convert 1080p MTS Videos to Windows Movie Maker
- Import and edit MTS/M2TS files with Windows Movie Maker
- Import/Edit/Transcode Sony NEX-5N/NEX-7/A57/A65/A77 1080 50/60P AVCHD to iMovie on Mac


 Home
Home Free Trial Video Converter


