GoPro Studio is known as a great piece of video editing software that compatible with GoPro, Canon, Nikon and other constant frame rate H.264 mp4 and .mov formats.
Although GoPro Studio software make GoPro media edits more easy than before, however, when trying to import GoPro media files to GoPro Studio for post-production workflow, there are so many issues such as keep on crashing problems, freezing on startup, very sluggish running or files failing to convert in GoPro Studio, etc.

In order to help you edit HD GoPro Footage flawlessly, this article aims to introduce several alternative to GoPro Studio, so that you can convert and edit GoPro Footage or any camera/camcorder footage without any trouble.
Alternative -- Pavtube HD Video Converter
As GoPro Studio can both process video editing and converting, it is ideal for you to find a software with the same capability. Pavtube HD Video Converter for Mac (Windows Version) are high recommended here.
The biggest merits of this program is its built-in versatile but simple to use video editing functions. You can trim GoPro media clips to cut off unwanted parts, merge separate videos into one, crop video file size to remove the black bars, add text/image/video watermark to protect video, apply special rendering effect, inserting external subtitles, etc as GoPro Studio does.
Worth to mention is, the program also gives the chance to wrap GoPro Media to professional video editing codec for post production workflow in NLE programs like iMovie/FCE/FCP/Avid/Adobe Premiere/Adobe After Efffects, etc.
Plus, it is more easy-to-use and offers some unbeatable features like batch conversion and downsize 4K videos to 1080p with high quality kept and more.
Overall, you can effortlessly find this program can be seen as the best GoPro Studio alternative and is even much better than it.
How-to Use: GoPro Footage Workflow with Alternative to GoPro Studio
Step 1. Download the Alternative to GoPro Studio.
Pavtube HD Video Converter is an easy-to use, functional video converter and video editor alternative to GoPro Studio, the trail-before-purchase is supported, just feel free to try it, it is 100% clean and safe.
Step 2. Add GoPro Footage into the Program.
When you start up Pavtube HD Video Converter, the main interface pops up, click "Add Video" button to load GoPro Footage to the program. You can also directly drag the video files into the program directly.
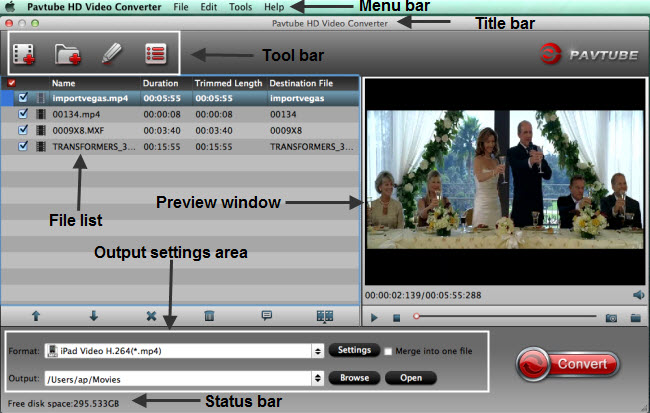
Step3. Set output format.
Click "Format" bar, from its drop-down options, here we choose "H.264 HD Video(*.mp4)" under "HD Video" main category as example. It maintain the original MPEG-4 AVC / H.264 codec of GoPro Footage.

Note: In "Profile Settings" window, you can also click "Size(pix)" to select "1920*1080" as the final resolution for output video to get a smaller video size and more smoothly when uploading or editing. Of course, you can input any resolution you want.
Step 4. Modiy the GoPro Footage.
On the "Video Editor" Window, you can play and preview the original video and output effects. Also you can flip video, trim, add 3D effect, reset, and adjust volume.
![]()
Play/Pause: Click to start playing the current video or pause the playing.
Play/Pause: Click to start playing the current video or pause the playing.
Stop: Click to quit playback.
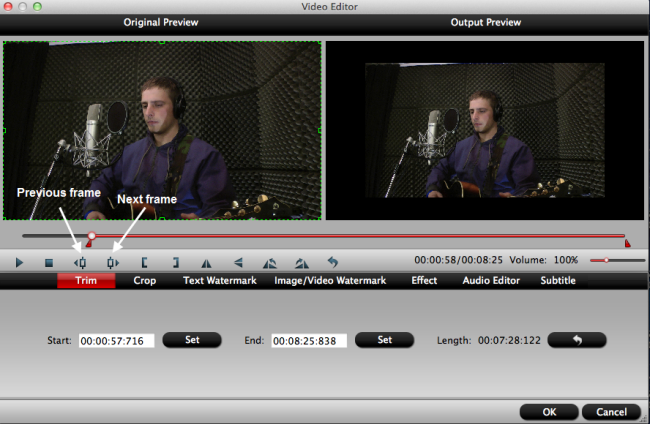
Previous Frame: Click and go back to the previous frame.
Next Frame: Click and go to the next frame.
Left square bracket: Click to set the start time for trimming.
Right square bracket: Click to set the end time for trimming.
Flip Horizontal: Click to flip the image horizontally.
Flip Vertical: Click to flip the image vertically.
Flip 90°towards left: Click to flip the image 90°towards left.
Flip 90°towards right: Click to flip the image 90°towards right.
Special Effect: Add special effect to source files.
Reset: Click to restore default value.
Volume slider: Drag to adjust volume.
In "Video Editor" there are seven edit tabs: Trim, Crop, Text Watermark, Image/Video Watermark, Effect, Audio Editor and Subtitle.

Trim: The "Trim" feature allows users to decide where to start and where to end when converting the selected clip, so that unwanted segments will be cut out after conversion.
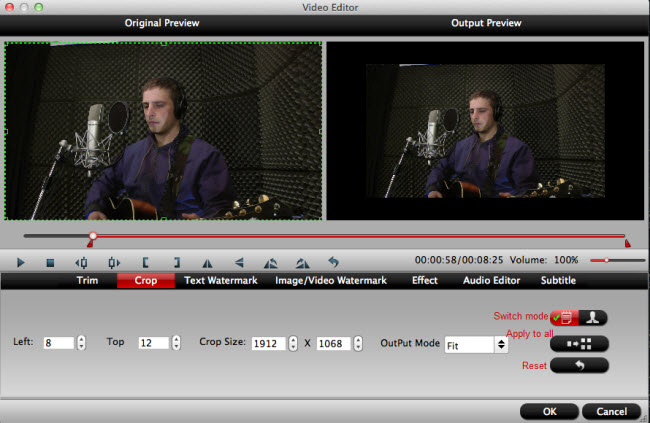
Crop: The "Crop" facility enables users to get rid of the black edges and unwanted area of the image.
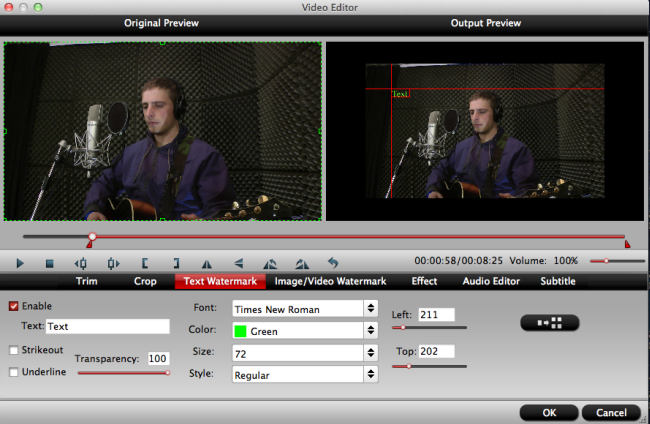
Text Watermark: Check Enable, you can add text watermark to selected video clip. You can either set parameters or drag the text on preview screen to set its location.
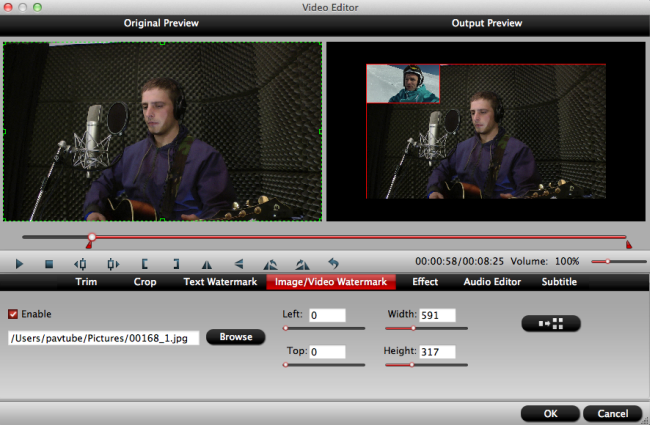
Image/Video Watermark: Check Enable, you can add images or videos as watermark onto selected video file. The location can also be set by dragging on the preview screen.
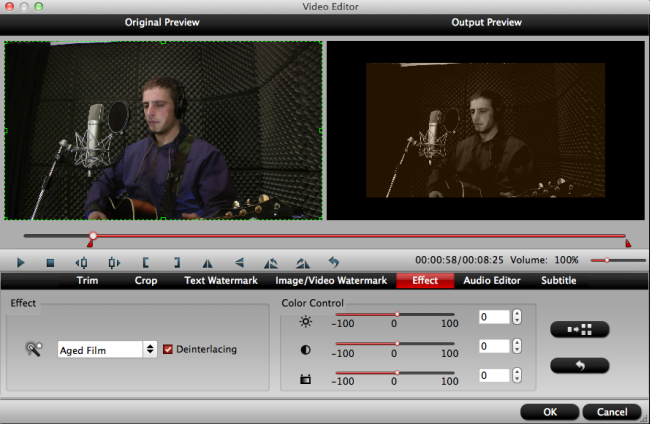
Effect: Under Effect tab, you can add 3D effect and other special effects like Simple Gauss Blur, Flip Color, Invert, Aged Film to your source video. In Color Control section, you can correct color by adjusting brightness, contrast, and saturation. You can also tick off "Deinterlacing" to keep good image quality.
You can either replace/remove original audio, or set audio fade in/out effects.

Subtitle: In this tab, you can add *.srt or *.ass/*.ssa subtitle-files to the video as hard subtitles.

Step 5. Start GoPro Footage conversion.
Clicking the Convert button on main interface, you can go to Conversion window to start conversion.
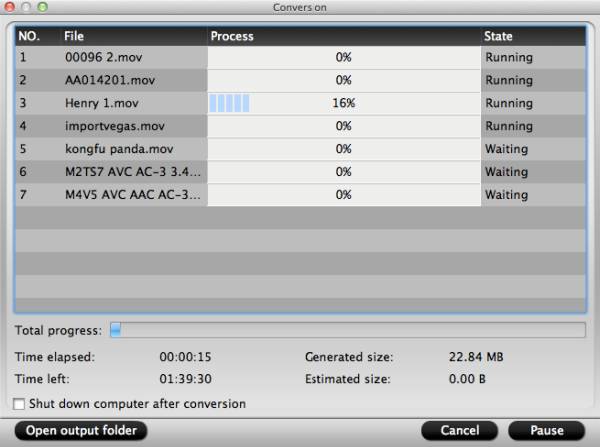
You can find conversion information on the window, such as Time elapsed, Time left, Generated size, and Estimated size.
Ticking off Shut down computer after conversion option, you can leave the program running and do other things instead of waiting around for the conversion.
After the conversion, you can click "Open" output folder to pop up output directory with the converted files with the eidt fetature you have done.
Note: If you are using a trial version, there will be Pavtube logo watermark in the middle of output files. To get rid of the logo watermark and get better performance, please click Help > Register > Order to buy full version. If you are running on Windows, please turn to Windows Version.
When you install Pavtube HD Video Converter, you are able to edit the GoPro Media with the built-in editor as given above. For the furthering editing, here we gives you the option to choose professional NLEs from Adobe Premiere Pro, Final Cut Pro X or SONY Vegas Pro.
If you encounter the incompatible issue with Adobe Premiere Pro, Final Cut Pro X or SONY Vegas Pro, don’t forget Pavtube HD Video Converter is a professional Converter, it can convert the GoPro Media as well as Canon, Nikon and almost any other video films to Adobe Premiere Pro, Final Cut Pro X or SONY Vegas Pro preset native supported MPEG-2 or Apple ProRes codec.
Alternative -- Adobe Premiere Pro
Adobe Premier Pro is a video editing software built for video editing professionals. The latest version includes amazing masking and tracking features and a pen tool that lets you put various effects in GoPro Footage easily.
Pros:
It has many features that can be used very effectively.
It comes with amazing editing tools.
Cons:
It is very expensive.
It requires very robust graphic card.
Alternative -- Final Cut Pro X
Final Cut Pro X is high-profile video editing software built by Apple Incorporations. It contains full resolution multiple streams of 4K ProRes. You can have your GoPro Footage even 4K video turned into it and editing in a professional way.
Pros:
Like every other Apple product is innovative and a very powerful tool.
Cons:
It is only supported by Mac OS X and so there is no support for Windows.
Alternative -- SONY Vegas Pro
This is another popular video editing tool used by professionals. It has gained a good reputation over the time because of the advance features. However, concerning the price factor, SONY Vegas is hardly recommendable for someone as it costs $599.95 to purchase the full version
Pros:
Innovative features
Lots of filters
Support any format
Cons:
Very high price ($599.95)
Needs High End PC performances
Conclusion
There are many other software tools which can be used to edit videos. However, as per the comparisons, Pavtube HD Video Converter is seem to be as the best alternative for GoPro studio concerning the features, tools, options and the affordability. Pavtube HD Video Converter has all the simple editable features that comes with other high end software tools, but for a very affordable price.
Useful Tips
- Review of 5 Best HD Video Converter for Mac (macOS Sierra Included)
- Import DJI Mavic Pro 4K video to iMovie for Editing
- Import DivX to iMovie (iMovie 11 Included)
- How to Convert ASF to iMovie (iMovie 11 Included) on Mac?
- Superior iMovie Alternatives for Mac (MacOS Sierra)
- 2017 Top 5 Best HD Video Converters for Mac OS X El Capitan/Yosemite/Mavericks


 Home
Home

 Free Trial HD Video Converter for Mac


