As a free and open-source video capture and video processing utility for Microsoft Windows, VirtualDub is designed to process linear video streams, including filtering and recompression. It uses AVI container to store capture video. Have some MP4 files in local hard drive and run into trouble to load them into VirtualDub for deleting segments of a video file, append new segments, reorder new segments, dissimilar video files or adding transition effects between segments. The following article will share 3 different files to input MP4 files into VirtualDub.
Method 1: Download plugins for MP4 formats
To open MP4 or other files in VirtualDub, you need a plugin called "Virtualdub FFMpeg Input Plugin".
Installation of VirtualDub FFmpeg Input Plugin:
Download the plug in and unzip it in VirtualDub's folder. The ZIP contains two folder one for Windows 32 bit while the other one for Windows 64 bits. Just delete the one that you don't need.
The plug in installed looks as below:
c:\Program Files\VirtualDub\plugins32\FFInputDriver.vdplugin
c:\Program Files\VirtualDub\plugins32\ffdlls\avcodec-55.dll
c:\Program Files\VirtualDub\plugins32\ffdlls\avformat-55.dll
c:\Program Files\VirtualDub\plugins32\ffdlls\avutil-52.dll
c:\Program Files\VirtualDub\plugins32\ffdlls\swscale-2.dll
This plugin is freeware and open source.
And yes, it also works with H264 (H264 MPEG-4 AVC) movies.
Method 2: Create an AVISynth script
By properly using AVISynth, you can easily open various kinds of video formats on VirtualDub. It works as below: First, you create a simple text document with special commands, called a script. These commands make references to one or more videos and the filters you wish to run on them. After that you run VirtualDub and open the script file. Then VirtualDub doesn't aware that AVISynth is working in the background, but thinks it's directly opening a filtered AVI file. Now let's see how to make the things happen:
Step 1: Install K-lite Codec Pack and update FFDshow
First, ensure that the target file is playable in Windows Media Player. So you need to install the necessary codecs to your computer. K-lite Codec Pack which always provides the latest and complete codecs is just fine. You can select a suitable version and choose the codecs you need.
Then open the target video file with Windows Media Player and it should play. If not, you should update your FFDShow to the latest version.
Step 2: Install AVISynth.
Then download and install AVISynth, and tick all the options during the installation.
Step 3: Create an AVISynth Script.
Open NotePad. Type DirectShowSource("c:locationtovideo.mp4"). Then replacec:locationtovideo.mp4 with the location to your video file (right click the video file to gain the location). Then go to "File" > "Save as" > "Save as Type: All files" and name your video file as video.avs. You can now import the video.avs file in Virtualdub.
Method 3: Convert MP4 to VirtualDub supported AVI format
As VirtualDub is made to operate exclusively on AVI files, therefore, you can convert the unsupported MP4 files to VirtualDub native readable AVI file formats. Here a simple solution in hand called Pavtube Video Converter (best video converter review) can do you a great favor to convert all MP4 files with different video and audio codec to VirtualDub handable Divx or Xvid AVI files with fast conversion speed and perfect output video quality. For your convenience, the program are available on both Windows and Mac, you can download the Mac version Pavtube Video Converter for Mac to convert MP4 for VirtualDub editing on Mac OS X El Capitan or macOS Sierra.
Hot topic:
Top 15 VirtualDub Alternative | VirtualDub Alternative to Rip DVD | Compress Movie with VirtualDub Alternative
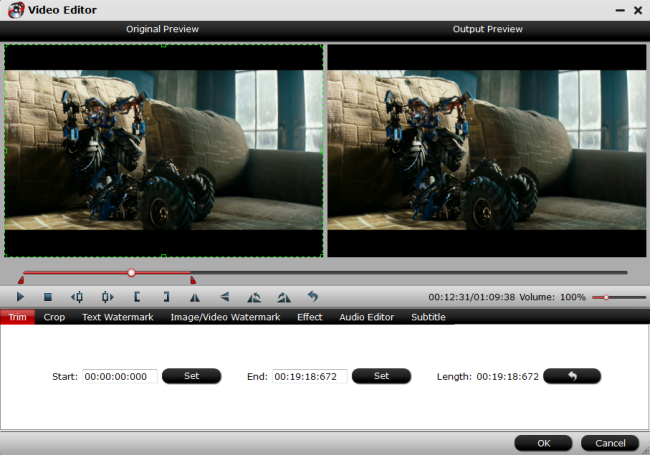
Apart from converting MP4 for VirtualDub, the program can also act as a simple video editor alternative to VirtualDub. You can use this program to flip or rotate video, trim or cut video files to remove unwanted parts or segments, crop video to remove the unwanted black bars or area, add image/video/transparent text watermark to video, apply special rendering effect to video, flip or rotate video angel, remove/replace audio in video, add external srt/ass/ssa subtitles to video, split large video into small clips by file size, count or length or merge separate video into one file.
Step by Step to Convert MP4 to VirtualDub AVI
Step 1: Load MP4 files into the program.
Install and launch the MP4 video converter program on your computer, click "File" > "Add Video/Audio" or "Add from Folder" to load unsupported MP4 files into the program.

Step 2: Choose output file format.
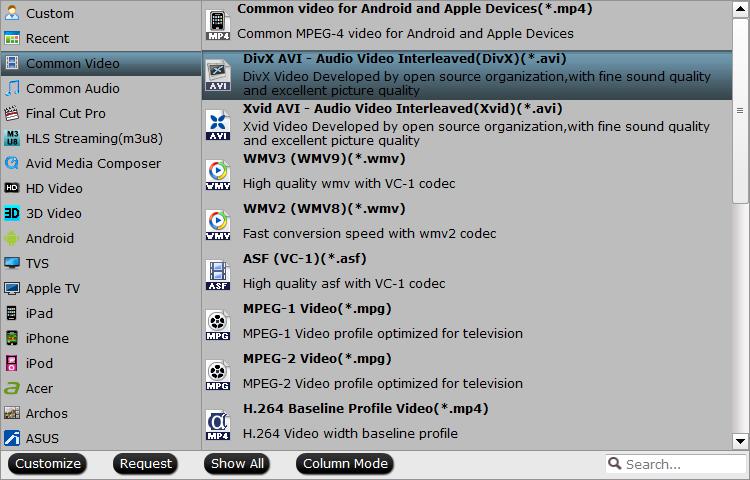
Click "Format", from its drop-down option, choose VirtualDub supported AVI format such as "Divx AVI - Audio Video Interleaved (Divx)(*.avi)" or "Xvid AVI - Audio Video Interleaved (Xvid)(*.avi)" under "Common Video" main category.

Tips: You can flexibly adjust the output video codec, bit rate, frame rate, resolution and audio codec, bit rate, sample rate and channels according to your own needs.
Step 3: Edit MP4 video.
Check an item to active the "Video Editor" function, then click the pencil like icon on the top tool bar to open the "Video Editor" window, you can trim video length, crop video black bars, add watermark, apply sepcial rendering effect, remove/replace audio in video, etc.

Step 4: Begin MP4 to VirtualDub conversion process.
After all settings is completed, hit right-bottom "Convert" button to begin the conversion from MP4 to VirtualDub conversion process.
When the conversion is completed, you can click "Open Output Folder" button to get the output files effortlessly, and now you will have no problems to import and edit MP4 files with VirtualDub.


 Home
Home

 Free Trial Video Converter


