Brief Intro of Interlaced Video
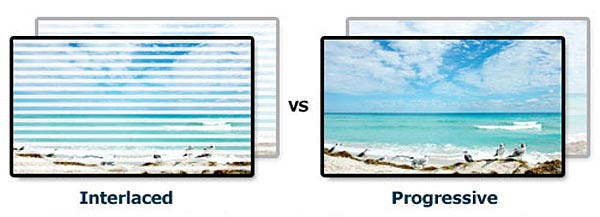
What do people mean when they talk about “interlaced video”, and why is it important? Interlaced video is a process wherein the frame rate of the video is doubled without affecting the bandwidth. It refers to one or two standard procedures used for displaying a video visual or an electronic display monitor, by scanning each line or row of pixels. This technology particularly came into wide use in the early days of television in order to fit a picture into the desired bandwidth. An interlaced video is refreshed twice every frame. Initially, even scan lines are refreshed followed by odd scan lines. Interlaced video is also known as interlaced display.
Progressive Scan VS Interlaced Scan
There are two basic ways to record and display a video image, progressive scan and interlaced scan, which helps you to have better understanding of fix video interlacing issue.
Progressive scan: captures, stores, transmits, and displays an image in which all the lines of each frame are drawn in sequence - line by line, top to bottom. A progressive video is listed with the letter "p", such as 480p, 720p or 1080p.
Interlaced scan: The first displays the first and all odd numbered lines, from the top left corner to the bottom right corner. The second pass displays the second and all even numbered lines, filling in the gaps in the first scan. An interlaced video is listed with the letter "i", such as 480i or 1080i.
What is Deinterlacing? Why Need to Deinterlace Video?
Deinterlacing video is the process of converting interlaced video, such as common analog television signals or 1080i format HDTV signals, into a non-interlaced form (progressive video). ----From Wikipedia
Interlacing only looks right on an old tube TV (Cathode Ray Tube, or CRT). Nowadays, old tube TVs are no longer being manufactured. So it’s safe to assume that whatever content you wish to broadcast to your audience, the (overwhelming) majority of it will be consumed over flat panel screens (LCDs, tablets, PCs, Plasmas, etc.). Most modern displays, such as LCD, DLP and plasma displays, only work in deinterlace mode, because they are fixed-resolution displays and only support progressive scan. In such case, to normally watch interlaced video on modern non-interlaced displays with better image quality, you have to deinterlace the video first.
Simple Steps to Deinterlace Video
Pavtube Video Converter for Windows/ Mac, a professional video deinterlacing program, can help you easily turn interlaced video to progressive scan video with its built-in Deinterlacing Engine.
It is not merely a video deinterlacing tool, but also a powerful video converter, video editor, etc.
Convert video: Enable you to flawlessly convert almost all popular videos, like convert HD MKV, H265/HEVC, AVCHD, M2TS, SD MP4, AVI, WMV, MOV, FLV and more from one format to another at fastest speed (30X faster than others) without quality loss.
Edit Video: Trim or cut video to remove unwanted parts or segments, split large video into small clips by file size, count or length, merge separate video into one file, crop video to remove the black borders or unwanted area, add video/image/transparent text watermark to video, flip or rotate video horizontally, vertically, clockwise or counterclockwise, apply special rendering effect to video, change video brightness, contrast, saturation, etc, remove/replace audio in video, insert external srt/ass/ssa subtitle to video.
Check below how to deinterlace video with the best video deinterlacing software in 1 click.
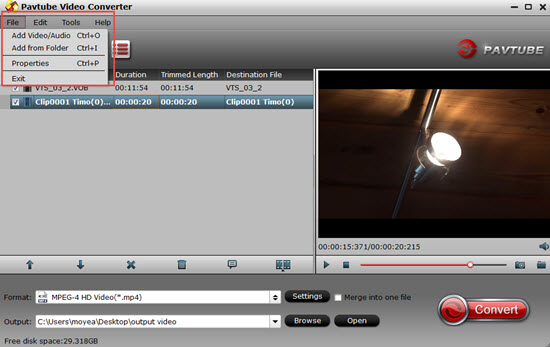
Step 1. After download this program, step into the main interface, click "File" > "Add Video/Audio" button to import interlaced digital video into the program.
Step 2: From "Format" drop-down list, select one of your desired file formats or device and program preset profile formats according to your own needs. If you do not want to re-encode the video, just select to output the same format as the original file format, also make sure do not change any profile settings for the output video.
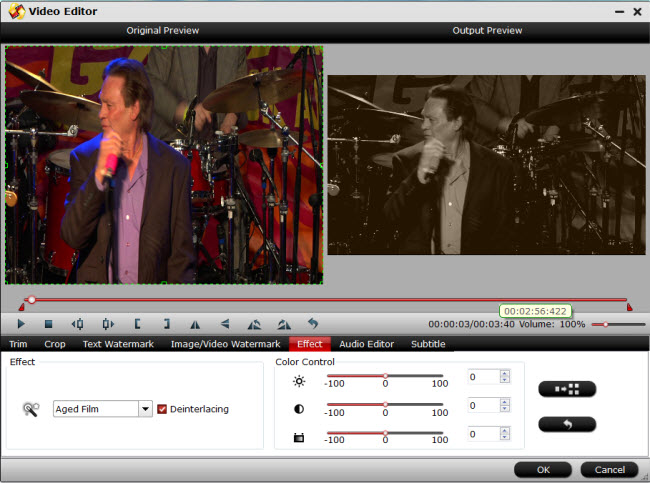
Step 3: Select an item on the main interface to activate the "Edit" menu, then click the "Edit" icon on the tool bar to open the "Video Editor" window, switch to the "Effect" tab, tick off "Deinterlacing" option to transform the interlaced video into a progressive form without any artifacts.
Step 4: Click "Browse" to set a destination folder to save the deinterlaced video. Hit "Convert" to start the video deinterlacing process to convert it into non-interlaced form.
Please feel free to share this tutorial if you think it is helpful!


 Home
Home


 Free Trial Video Converter


