Windows Media Video, or WMV, is a video format developed by Microsoft that can be played with Windows Media Player. However, the Mac version of Windows Media Player has been discontinued, and no longer works with newer Macs. When Mac users attempts to open and play WMV files by default in QuickTime, they’ll commonly receive an error message along the lines of "This is not a movie file." The good news is that there are still a few free and easy solutions to play WMV files on Mac.
Solution 1: Play WMV files with free Mac Video Player
VLC Media Player
As the most versatile player, VLC lets you play WMV files without using any plugin. The program is very lightweight, fast and can handle almost any file formats you throw to it. What’s more, it is cross-platform, therefore, you can run it on both Windows and Mac platform.
MPlayerX
MPlayer OSX is a simple but powerful video player designed specifically for Mac and can handle WMV playback. It features more options and preferences than VLC Player, with the only drawback being that the first time it plays a video, it has to build a font cache, which can take a while. Luckily, it only has to be done once.
QuickTime + Flip4Mac
Flip4Mac, the "Windows Media Components for QuickTime" is a free collection of QuickTime components that lets you play Microsoft WMV file on Mac, either through QuickTime Player or right in your browser. This Microsoft-designed application attaches itself to QuickTime. You don't notice the application once installed, but when WMV files are activated, they play directly through QuickTime.
Divx Player
This is also a great WMV Player for Mac. DivX Player offers high-quality movies, TV shows and web video clips and smooth video playback experience. With this Free WMV player for Mac, you can play videos in different formats, such as WMV, AVI, DIVX, MKV, MP4, etc.
Related article: Edit WMV in Premiere Pro | WMV to Instagram | Play WMV with PS4
Solution 2: Convert WMV to Mac compatible file format
For those people who insist on to play WMV files on Mac with QuickTime player or wish to transfer and view WMV files also on iOS devices such as iPhone, iPad, etc. It would be much ideal for you to download a WMV Converter for Mac. Here, we highly recommend Pavtube Video Converter for Mac to you.
The program has perfect importing support for the WMV files encoded with various different compression codec such as VC-1, WMV2, WM2, etc. Thanks for its batch conversion mode, you can load multiple WMV files at one time to save your precious time. You can easily convert WMV files to QuickTime player and other iOS devices readable QuickTime MOV, MP4, M4V, H.264 or even H.265 format with perfect quality and super-fast encoding speed. Moreover, it also benefits you by directly outputting WMV to popular Mac NLE software such as iMovie, Final Cut Pro X most preferable editing codec Apple Intermediate Codec (AIC) or Apple Prores so that you can the best editing workflow with high quality and perfect performance.
To achieve the best output video and audio quality, you can flexibly adjust output video codec, resolution, bit rate, frame rate and audio codec, bit rate, sample rate, channels, etc according to your own needs.
Pavtube Video Converter for Mac has perfect OS compatibility with the new macOS High Sierra, macOS Sierra, Mac OS X El Capitan, Mac OS X Yosemite, Mac OS X Mavericks, etc.
Step by Step to Convert WMV to Mac Compatible File Formats
Step 1: Load WMV files into the application.
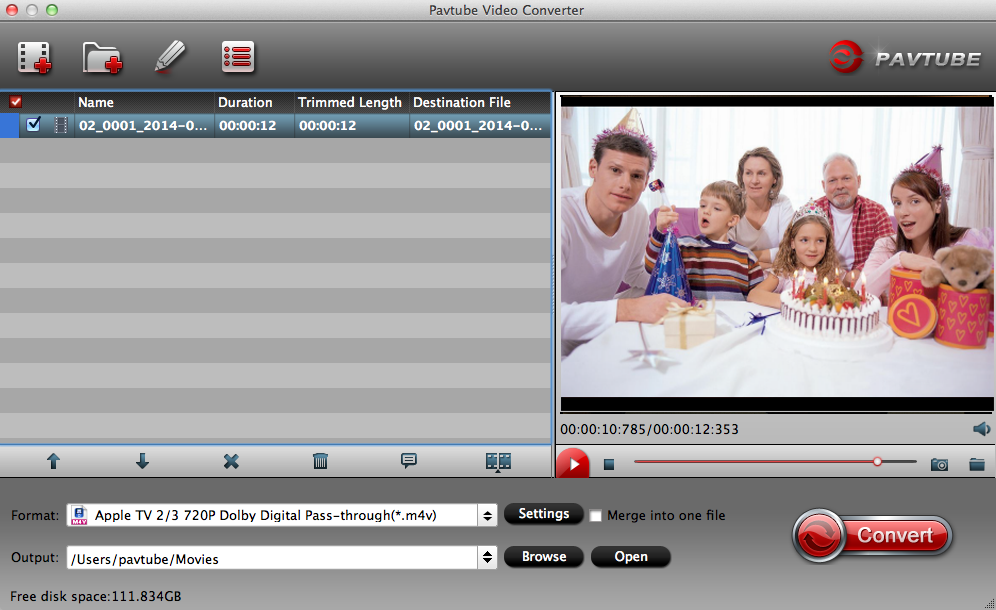
Download the free trial version of the program. Launch it on your computer. Click "File" menu and select "Add Video/Audio" or click the "Add Video" button on the top tool bar to import source WMV files into the program.

Step 2: Define the output format.
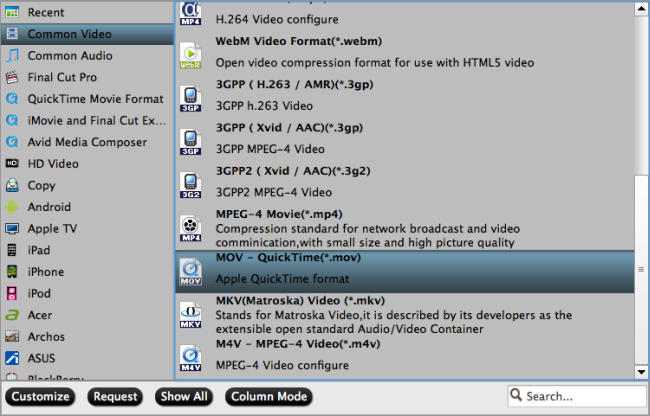
Clicking the Format bar, from its drop-down list, select one of your desired Mac compatible file format such as "MOV - QuickTime(*.mov)" under "Common Video" main category. You can also select other iOS devices or NLE software compatible file format according to your own needs.

Tips: Click "Settings" on the main interface to open "Profile Settings" window, here, you can flexibly choose or specify exactly the profile parameters including video codec, resolution, bit rate, frame rate, audio codec, bit rate, sample rate, channels, etc as you like to get better output video and audio quality.
Step 3: Start the final conversion process.
After all setting is completed, hit the "Convert" button at the right bottom of the main interface to begin the conversion process from WMV to compatible file formats for better QuickTime playback, iOS devices viewing or NLE software editing.
When the conversion is finished, click "Open Output Folder" icon on the main interface to open the folder with generated files.


 Home
Home Free Trial Video Converter for Mac


